From Scans to Bright Spaces: Navigating 3D Room Scanning and Lighting Planning with Metaroom® and ReluxDesktop
Learn what 3D room scanning is, how to utilize Metaroom® for creating precise 3D models, and how to implement them in ReluxDesktop for strategic lighting planning.
What is 3D Room Scanning with Metaroom®?
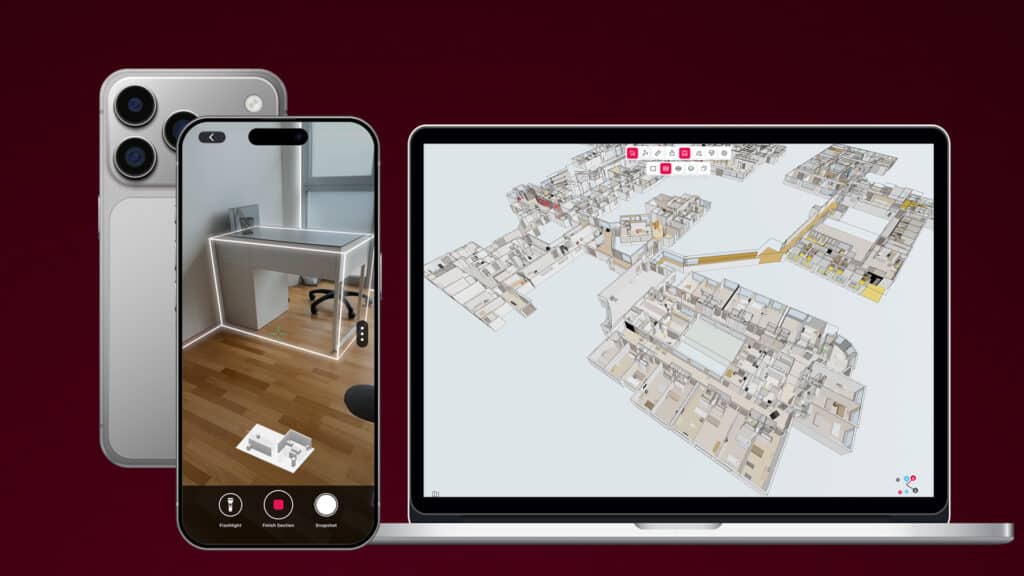
3D room scanning with Metaroom® is a technologically advanced method that allows you to create accurate, to-scale 3D models of physical spaces, which can be utilized in ReluxDesktop for meticulous lighting planning. You can scan single rooms or entire buildings, generating detailed 3D models that serve as a robust foundation for your lighting designs in ReluxDesktop.
What You Need
- An iPhone Pro device, starting from generation 12 or an iPad Pro from 2020 or newer* that runs on iOS17
- Metaroom® App for 3D room scanning
- ReluxDesktop software for strategic lighting planning
- A project or space that requires lighting planning, whether it’s a single room or an entire building
*Note: The Metaroom App is specifically designed to work with iPhone Pro and iPad Pro devices that have a LiDAR sensor, ensuring optimal functionality and precision in 3D room scanning.
How to Perform 3D Room Scanning with Metaroom
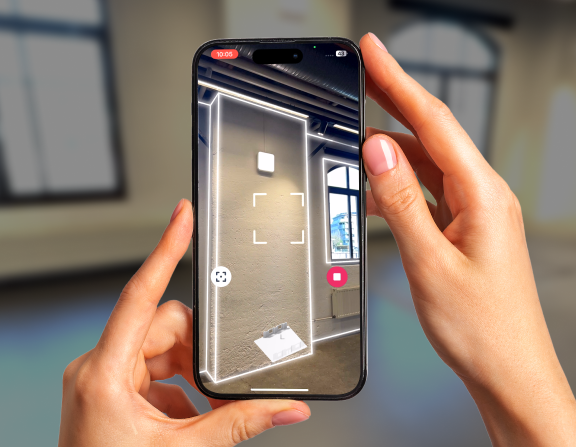
1. Conducting a Single Room Scan
Performing a single room scan with Metaroom® is straightforward and user-friendly, designed to be easily accessible even for beginners. Here’s a step-by-step guide to ensure your scans are precise and comprehensive:
- Follow the Guidance: Metaroom® provides hints during the scan. No messages mean you’re on the right track!
- Maintain a Moderate Speed: Start in a clear corner and move your device steadily up and down, like recording a video.
- Keep Distance: Ensure a minimum distance of 2 meters (5ft) from walls and objects (if possible).
- Navigate the Room: In larger spaces, walk around, maintaining a 2 to 5 meters (6.5-16.5ft) distance from walls and objects.
- Scan Duration: An average 15 m2 (160 ft2) room might take about 2 minutes, with recommended scan durations between 2-15 minutes.
- Check the Preview: The 3D model preview will indicate scanned areas. Ensure all walls, openings, and defining elements are scanned.
- Conclude the Scan: End the scan once the preview 3D model is complete.
2. Executing a MultiRoom Scan
Achieving a flawless MultiRoom scan with Metaroom® is a breeze, especially when you follow these three straightforward steps and keep in mind some essential tips:
In 3 Easy Steps to a Perfect MultiRoom Scan
Step 1: Initiate the Scan
Simply tap the ‘+’ symbol to begin, just as you would for a regular scan.
Step 2: Add Additional Rooms
Once you’ve successfully scanned one room and wish to add another, tap the “scan +” button on the screen’s bottom. Helpful prompts will appear between scans to ensure accuracy and provide a scan overview.
Step 3: Finalize the MultiRoom Scan
Continue adding rooms as needed, and once all areas are covered, click “finish”. Validate your progress by checking the dollhouse view at the screen’s bottom.
Important Tips for a Perfect MultiRoom Scan
- Keep the Camera Clear: Ensure the camera is unobstructed when moving between rooms to preserve vital “world tracking data” and ensure seamless room stitching.
- Hold the Device Upright: Maintain an upright device position, even when transitioning between rooms, to facilitate continuous tracking and smooth stitching.
- Close Doors for Optimal Results: Ensure doors are closed after entering the next room and before initiating the next scan for optimal accuracy and completeness in the resulting 3D model.
How to Prepare Your Scans in Metaroom Studio for ReluxDesktop Export
Embarking on your lighting planning journey begins with the meticulous preparation of your 3D scans in Metaroom Studio, ensuring they are primed for a seamless export to ReluxDesktop. The process is not merely a technical task but a pivotal stage where your spatial scans are refined, categorized, and prepared, laying a solid foundation for your subsequent lighting designs in ReluxDesktop.
In Metaroom Studio, your scans are fine-tuned, assets are grouped and categorized, and the 3D model is validated to ensure that once it transitions into ReluxDesktop, your lighting planning can commence without a hitch. This preparation phase is where you ensure that every room, every wall, and every defining feature is accurately represented and categorized, ensuring that your lighting designs in Relux are both precise and in alignment with your spatial design.
By diligently preparing your scans in Metaroom Studio, you’re not just exporting data; you’re ensuring that the canvas upon which your lighting planning will be implemented in Relux is accurate, detailed, and a true reflection of the physical space. This meticulous preparation in Metaroom Studio ensures that your creative and technical lighting planning process in Relux is built upon a solid, accurate foundation, paving the way for designs that are both aesthetically and functionally stellar.
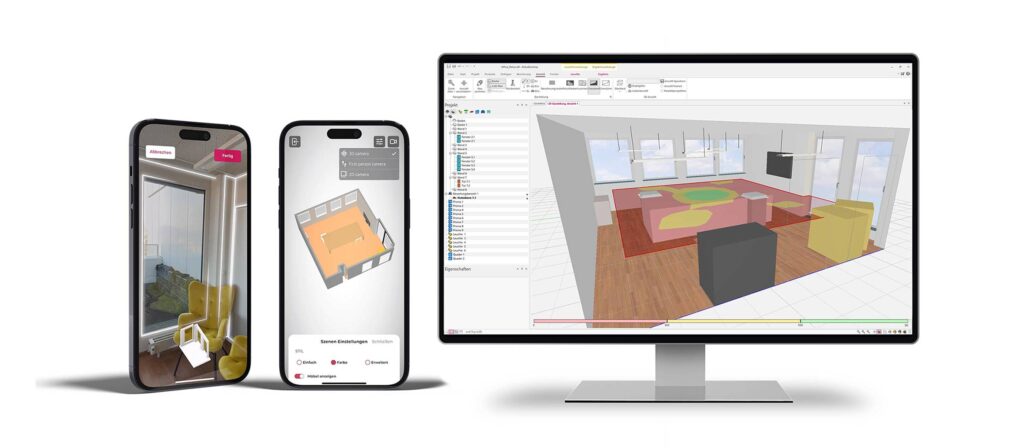
Step-by-Step Guide: From MultiRoom Scan to ReluxDesktop Export
Navigating from your meticulous MultiRoom scans in Metaroom Studio to a flawless transition to ReluxDesktop (.rdf) format is a streamlined process. Here’s a step-by-step guide to ensure your lighting planning is both accurate and efficient:
- Scan:
Execute the MultiRoom Scan as outlined in the previous section.
- Edit in Metaroom Studio:
Transition to Metaroom Studio and open your MultiRoom Scan.
2.1. Optimize Your 3D Model for Lighting Planning:- Open the right-side menu and select “Show/Hide Floor” in your model tree to display only the floor intended for your lighting planning.
- Click the “enable select” icon in the upper right corner.
- Select all assets (walls and objects) pertaining to a single room with the mouse.
- Right-click on the selected area, navigate to “assign to > new group”, and name the new group appropriately, e.g., “Living room 1st floor”.
- Repeat for all other rooms.
- Review & Validation:
Utilize color coding for different groups to ensure all rooms necessary for the lighting design have been captured.
- Export:
Select the rooms designated for lighting planning and click on “Export selection to Relux (.rdf) format”.
Your selected rooms are now exported to ReluxDesktop, enabling you to perform lighting design for all individual rooms previously defined in Metaroom Studio.
By adhering to the above steps in Metaroom Studio, you ensure a seamless and error-free export to ReluxDesktop (.rdf) every time, paving the way for impeccable lighting planning!
Conclusion
Navigating through the practical steps of converting physical spaces into digital formats, Metaroom and ReluxDesktop collaboratively streamline your lighting planning process. The precise scanning and preparation in Metaroom and Metaroom Studio translate your spaces into detailed 3D models, which then become the foundation for your lighting planning in ReluxDesktop. This smooth transition from scanning to designing ensures that your lighting plans are technically accurate and aesthetically aligned with the actual physical environments. The combination of Metaroom’s detailed scanning and ReluxDesktop’s comprehensive lighting planning tools offers lighting planners a straightforward, accurate, and creatively rewarding workflow. Your designs, grounded in the accurate digital replicas of your spaces, ensure each lighting plan is both a technical and visual success.
Take the First Step Towards Enlightened Design
Ready to enhance your lighting planning process with precision and ease?
Download the Metaroom® app and ReluxDesktop today and immerse yourself in a realm where your lighting designs are seamlessly integrated with the true dimensions of your spaces, ensuring every project shines in its best light.
Read more FAQs
Read about new features like Points Of Interest and other export formats.